 Image credit: Unsplash
Build a CRUD App in React
In this article, We’ll walk step-by-step through the process of building out a simple React CRUD app with Web API. It will have tasks, we’ll be able to add, update, list or delete tasks.
Prerequisites
In order to follow along with this article, you’ll need a basic knowledge of HTML, CSS, and JavaScript/ES6. You should also know the fundamentals of React, which you can learn by reading Getting Started with React.
Create React App
We’ll start by installing the project with create-react-app.
Create React App is the best way to start building a new single-page application in React.
To create a project, run the following command:
npx create-react-app react-todo-app
Note:
npmincludesnpxtool — a package runner tool that comes with npm 5.2+.
Once that finishes, move to the newly created directory and start the project.
cd react-todo-app
npm start
Once you run this command, a new window will popup at localhost:3000 with our new React app.
Initial Setup
Now, We’ll install bootstrap to provide user interface to our app.
npm install bootstrap@4.6.0
Go ahead and delete everything from the /src folder except App.js, index.js, and index.css.
In index.js, add the following lines of code:
// src/index.js
import React, { Component } from "react";
import ReactDOM from "react-dom";
import App from "./App";
import "./index.css";
import "bootstrap/dist/css/bootstrap.css";

ReactDOM.render(<App />, document.getElementById("root"));
Now open App.js and add the following lines of code, which will display our app name TODO App at center of page.
// src/App.js
import React, { Component } from "react";

export default class App extends Component {
  render() {
    return (
      <div className="container">
        <h1 className="text-uppercase text-center my-2">Todo App</h1>
        <div className="row">
          <div className="col-8 col-md-6 mx-auto mt-2">
            <h3 className="text-capitalize text-center">Todo Input</h3>
            <h3 className="text-capitalize text-center">Todo List</h3>
          </div>
        </div>
      </div>
    );
  }
}
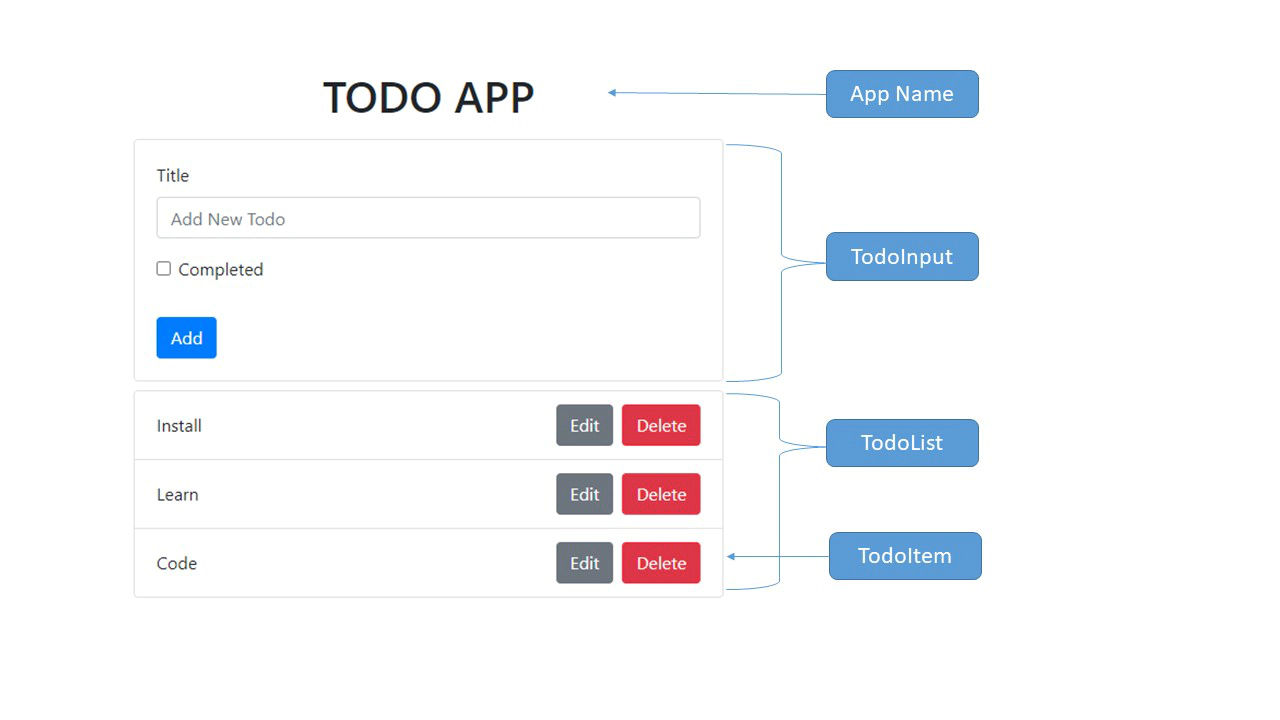
We’ll now create basic layout with three components as shown in below reference layout:
- TodoInput
- TodoItem
- TodoList

TodoInput
TodoInput present the input form to add new todo item in our list.
Create a src/components/TodoInput.js file and add the contents with the following lines of code:
// src/components/TodoInput.js
import React, { Component } from "react";

export default class TodoInput extends Component {
  render() {
    return (
      <div className="card card-body">
        <form action="">
          <div className="form-group">
            <label>Title</label>
            <input
              type="text"
              name="title"
              className="form-control text-capitalize"
              placeholder="add todo item"
            />
          </div>
          <div className="form-group form-check">
            <input
              type="checkbox"
              name="completed"
              className="form-check-input"
            />
            <label className="form-check-label">Completed</label>
          </div>
          <button type="submit" className="btn btn-primary mt-2">
            Add
          </button>
        </form>
      </div>
    );
  }
}
TodoItem
TodoItem present one item in the todo-list, which will have todo title with Edit and Delete button.
Create a src/components/TodoItem.js file and add the contents with the following lines of code:
// src/components/TodoItem.js
import React, { Component } from "react";

export default class TodoItem extends Component {
  render() {
    return (
      <li className="list-group-item d-flex justify-content-between align-items-center">
        <span className="todo-title mr-2">Title</span>
        <span>
          <button className="btn btn-secondary mr-2">Edit</button>
          <button className="btn btn-danger">Delete</button>
        </span>
      </li>
    );
  }
}
TodoList
TodoList present the ul list of todo that contains the loop of TodoItem components (made of li elements`)
Create a src/components/TodoList.js file and add the contents with the following lines of code:
// src/components/TodoList.js
import React, { Component } from "react";
import TodoItem from "./TodoItem";

export default class TodoList extends Component {
  render() {
    return (
      <ul className="list-group my-2">
        <TodoItem />
      </ul>
    );
  }
}
Finally, import TodoItem and TodoList in App.js as below:
// src/App.js
import React, { Component } from "react";
import TodoInput from "./components/TodoInput";
import TodoList from "./components/TodoList";

export default class App extends Component {
  render() {
    return (
      <div className="container">
        <h1 className="text-uppercase text-center my-2">Todo App</h1>
        <div className="row">
          <div className="col-8 col-md-6 mx-auto mt-2">
            <TodoInput />
            <TodoList />
          </div>
        </div>
      </div>
    );
  }
}
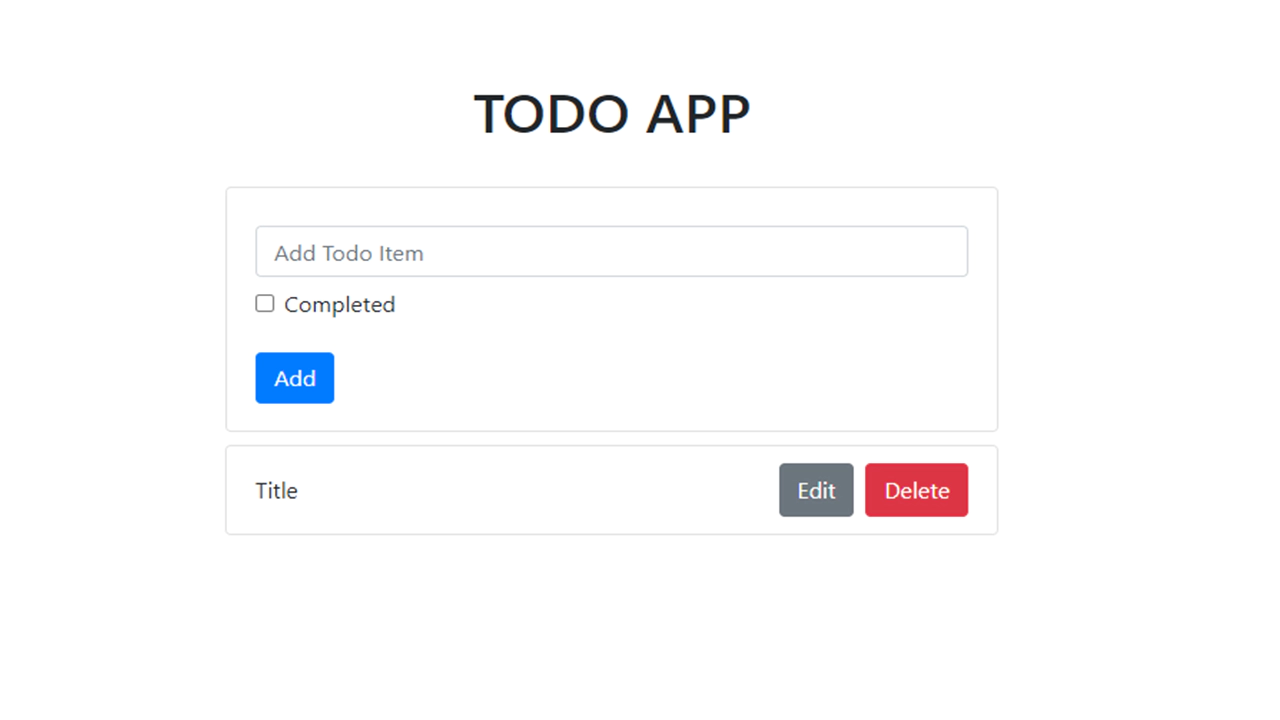
Now we have the initial setup and skeleton for the app.

Setting up the View
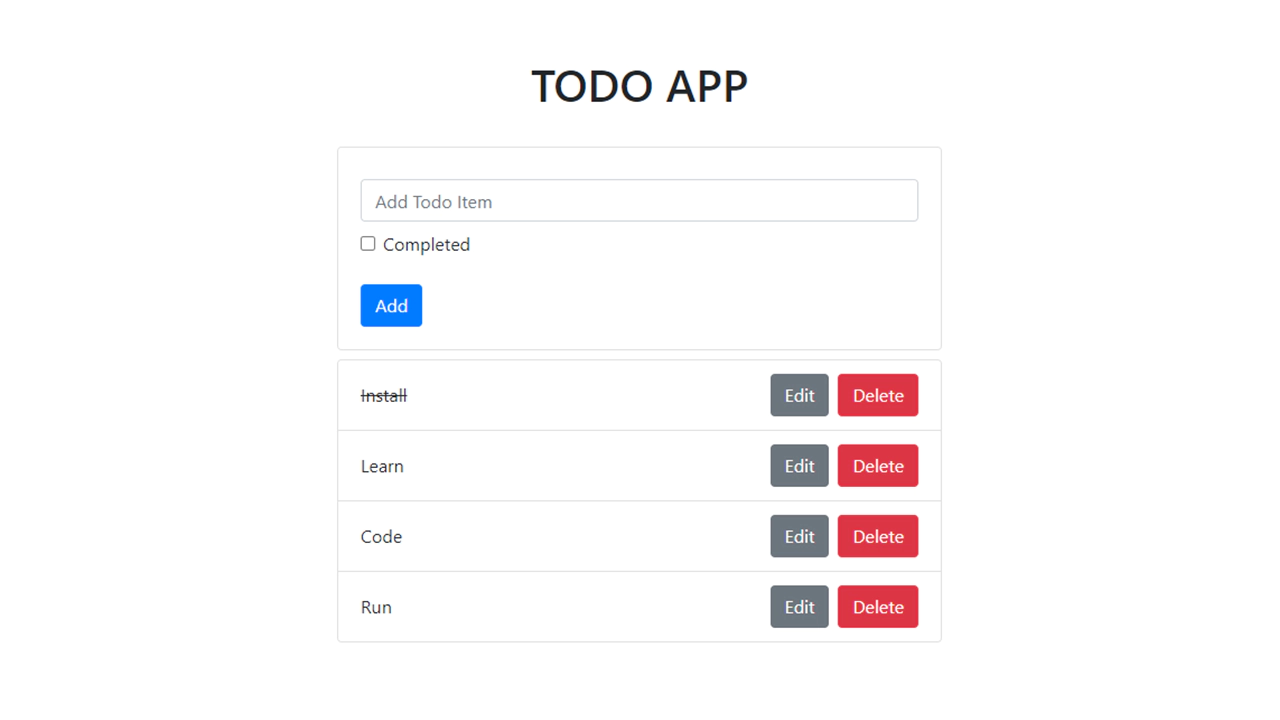
We have setup basic skeleton of the app, Let’s bring in some random dummy data and assign with state and props.
Let’s add tasks data to an array of objects and pass the data to the child component (TodoList) with properties.
Open the src/App.js file in code editor and add the following lines of code:
// src/App.js
import React, { Component } from "react";
import TodoInput from "./components/TodoInput";
import TodoList from "./components/TodoList";

const todoItems = [
  {
    _id: 1,
    title: "Install",
    completed: true,
  },
  {
    _id: 2,
    title: "Learn",
    completed: false,
  },
  {
    _id: 3,
    title: "Code",
    completed: false,
  },
  {
    _id: 4,
    title: "Run",
    completed: false,
  },
];

export default class App extends Component {
  state = {
    todoList: todoItems,
  };
  render() {
    return (
      <div className="container">
        <h1 className="text-uppercase text-center my-4">Todo App</h1>
        <div className="row">
          <div className="col-8 col-md-6 mx-auto mt-2">
            <TodoInput />
            <TodoList items={this.state.todoList} />
          </div>
        </div>
      </div>
    );
  }
}
Now, access that from other side. We’ll map through the items data we sent through and We’ll pass each item through to the TodoItem, once again through props.
Open the src/components/TodoList.js file in code editor and add the following lines of code:
// src/components/TodoList.js
import React, { Component } from "react";
import TodoItem from "./TodoItem";

export default class TodoList extends Component {
  render() {
    const { items } = this.props;
    return (
      <ul className="list-group my-2">
        {items.map((item) => {
          return <TodoItem item={item} />;
        })}
      </ul>
    );
  }
}
Here, we get the item from props and display the properties of each item.
Open the src/components/TodoItem.js file in code editor and add the following lines of code:
// src/components/TodoItem.js
import React, { Component } from "react";

export default class TodoItem extends Component {
  render() {
    const { item } = this.props;
    return (
      <li
        key={item._id}
        className="list-group-item d-flex justify-content-between align-items-center"
      >
        <span className="mr-2">
          {item.completed ? <s>{item.title}</s> : item.title}
        </span>
        <span>
          <button className="btn btn-secondary mr-2">Edit</button>
          <button className="btn btn-danger">Delete</button>
        </span>
      </li>
    );
  }
}

Now that the basic view is set up, let’s get the adding functionality working.
Adding a new task
We have already setup the form to add a new task. Right now, the form is empty, and you cannot add any values to it, nor does the submit button do anything.
We’ll want to make some state for keeping track of what’s currently in the add task form.
I’m going to create an initial state with those empty values. Having initial state in a variable is useful, because after we submit the form, we can return it to the initial, empty value.
// src/App.js
state = {
  todoList: todoItems,
  activeItem: {
    title: "",
    completed: false,
  },
};
Now we’ll create two functions, first handleChange to update the state within the form and second handleSubmit to actually submit the form and save the task, and pass it through TodoInput.
// src/App.js
handleChange = (e) => {
  let { name, value } = e.target;

  if (e.target.type === "checkbox") {
    value = e.target.checked;
  }

  const activeItem = { ...this.state.activeItem, [name]: value };
  this.setState({ activeItem });
};
handleSubmit = (item) => {
  alert("Save :: " + JSON.stringify(item));
};
and here we pass it through the TodoInput:
// src/App.js
render() {
  return (
    <div className="container">
      <h1 className="text-uppercase text-center my-4">Todo App</h1>
      <div className="row">
        <div className="col-8 col-md-6 mx-auto mt-2">
        <TodoInput
            activeItem={this.state.activeItem}
            handleChange={this.handleChange}
            handleSubmit={this.handleSubmit}
          />
          <TodoList items={this.state.todoList} />
        </div>
      </div>
    </div>
  );
}
Now we extract the values from the state object, and reference our function in the onChange event. We’ll also add button onClick funtion to actually submitting the form.
// src/components/TodoInput.js
import React, { Component } from "react";

export default class TodoInput extends Component {
  render() {
    const { activeItem, handleChange, handleSubmit } = this.props;
    return (
      <div className="card card-body">
        <form action="">
          <div className="form-group">
            <label>Title</label>
            <input
              type="text"
              name="title"
              className="form-control text-capitalize"
              placeholder="add todo item"
              value={activeItem.title}
              onChange={handleChange}
            />
          </div>
          <div className="form-group form-check">
            <input
              type="checkbox"
              name="completed"
              className="form-check-input"
              checked={activeItem.completed}
              onChange={handleChange}
            />
            <label className="form-check-label">Completed</label>
          </div>
          <button
            type="submit"
            className="btn btn-primary mt-2"
            onClick={() => handleSubmit(activeItem)}
          >
            Add
          </button>
        </form>
      </div>
    );
  }
}
Now that we’ve setup the functionality to add new task. If you try to submit new task then it will show you “save” alert which not actully adding the new task into list we’ll connect to the endpoints later.
Updating a task
The next puzzle is introducing the ability to update existing tasks. This will be similar to adding a task, except we’ll have to be able to identify which task is being edited.
The way we’re going to structure this is when the Edit action is selected for a task, the “Add” form will become an “Edit” form, and it will be pre-populated with the data from the selected task.
Let’s begin. In App.js, the first thing we’ll want to do is make state for whether or not edit mode is turned on. It will begin as false.
// src/App.js
state = {
  todoList: todoItems,
  activeItem: {
    title: "",
    completed: false,
  },
  editItem: false,
};
When button Edit is selected on a task, it should turn on edit mode, and set the active item, which we’ll do in this handleEdit function.
// src/App.js
handleEdit = (item) => {
  this.setState({ activeItem: item, editItem: true });
  alert("Edit :: " + JSON.stringify(item));
};
And, when the form is submitted it should turn off edit mode which we’ll do in handleSubmit function.
// src/App.js
handleSubmit = (item) => {
  this.setState({
    editItem: false,
  });
  alert("Save :: " + JSON.stringify(item));
};
Now just pass that function to TodoList:
// src/App.js
<TodoList items={this.state.todoList} handleEdit={this.handleEdit} />
Now extract in TodoList.js and pass it to TodoItem.js:
// src/components/TodoList.js
import React, { Component } from "react";
import TodoItem from "./TodoItem";

export default class TodoList extends Component {
  render() {
    const { items, handleEdit } = this.props;
    return (
      <ul className="list-group my-2">
        {items.map((item) => {
          return <TodoItem item={item} handleEdit={handleEdit} />;
        })}
      </ul>
    );
  }
}
Now extract in TodoItem.js and set onClick on Edit button:
// src/components/TodoItem.js
import React, { Component } from "react";

export default class TodoItem extends Component {
  render() {
    const { item, handleEdit } = this.props;
    return (
      <li
        key={item._id}
        className="list-group-item d-flex justify-content-between align-items-center"
      >
        <span className="mr-2">
          {item.completed ? <s>{item.title}</s> : item.title}
        </span>
        <span>
          <button
            className="btn btn-secondary mr-2"
            onClick={() => handleEdit(item)}
          >
            Edit
          </button>
          <button className="btn btn-danger">Delete</button>
        </span>
      </li>
    );
  }
}
Now we’ll pass edit mode status to TodoInput to change the “Add” form to “Edit” form:
// src/App.js
<TodoInput
  activeItem={this.state.activeItem}
  editItem={this.state.editItem}
  handleChange={this.handleChange}
  handleSubmit={this.handleSubmit}
/>
Accordingly we’ll change in TodoInput:
// src/components/TodoInput.js
import React, { Component } from "react";

export default class TodoInput extends Component {
  render() {
    const { activeItem, editItem, handleChange, handleSubmit } = this.props;
    return (
      <div className="card card-body">
        <form action="">
          <div className="form-group">
            <label>Title</label>
            <input
              type="text"
              name="title"
              className="form-control text-capitalize"
              placeholder="add todo item"
              value={activeItem.title}
              onChange={handleChange}
            />
          </div>
          <div className="form-group form-check">
            <input
              type="checkbox"
              name="completed"
              className="form-check-input"
              checked={activeItem.completed}
              onChange={handleChange}
            />
            <label className="form-check-label">Completed</label>
          </div>
          <button
            type="submit"
            className={
              editItem ? "btn btn-success mt-3" : "btn btn-primary mt-3"
            }
            onClick={() => handleSubmit(activeItem)}
          >
            {editItem ? "Edit" : "Add"}
          </button>
        </form>
      </div>
    );
  }
}
So at this point clicking on the Edit button should toggle edit mode, and we should be able to update a task.
Deleting task
The next one we’ll tackle is deleting a task, which is the easiest functionality to take care of.
In App.js, we’ll create handleDelete, which will delete the item from the list:
// src/App.js
handleDelete = (item) => {
  alert("Delete :: " + JSON.stringify(item));
};
We pass that function through props to TodoList:
// src/App.js
<TodoList
  items={this.state.todoList}
  handleEdit={this.handleEdit}
  handleDelete={this.handleDelete}
/>
Then we pass that function through props to TodoItem:
// src/components/TodoList.js
import React, { Component } from "react";
import TodoItem from "./TodoItem";

export default class TodoList extends Component {
  render() {
    const { items, handleEdit, handleDelete } = this.props;
    return (
      <ul className="list-group my-2">
        {items.map((item) => {
          return (
            <TodoItem
              item={item}
              handleEdit={handleEdit}
              handleDelete={handleDelete}
            />
          );
        })}
      </ul>
    );
  }
}
Now all we need to do in TodoItem.js is make sure the delete button calls that function.
// src/components/TodoItem.js
import React, { Component } from "react";

export default class TodoItem extends Component {
  render() {
    const { item, handleEdit, handleDelete } = this.props;
    return (
      <li
        key={item._id}
        className="list-group-item d-flex justify-content-between align-items-center"
      >
        <span className="mr-2">
          {item.completed ? <s>{item.title}</s> : item.title}
        </span>
        <span>
          <button
            className="btn btn-secondary mr-2"
            onClick={() => handleEdit(item)}
          >
            Edit
          </button>
          <button className="btn btn-danger" onClick={() => handleDelete(item)}>
            Delete
          </button>
        </span>
      </li>
    );
  }
}
Now we can delete some or all of the tasks.
Connecting to the endpoints
These are endpoints that Node.js Express App will release, you can learn how to create backend by reading ‘Build a CRUD app in Node.js Express’
| ENDPOINT | METHOD | DESCRIPTION |
|---|---|---|
| /api/v1/tasks | GET | Get all tasks |
| /api/v1/tasks | POST | Create a new task |
| /api/v1/tasks/:id | GET | Get a task details |
| /api/v1/tasks/:id | PATCH | Update a task |
| /api/v1/tasks/:id | DELETE | Delete a task |
Now, we will modify the application so that it interacts with the above Web APIs.
To make requests to the API endpoints on the backend server, we will install a JavaScript library called axios.
npm install axios@0.21.1
Then open the package.json file in code editor and add a proxy:
// package.json
[...]
  "name": "todos",
  "version": "0.1.0",
  "private": true,
  "proxy": "http://localhost:5000",
  "dependencies": {
    "axios": "^0.21.1",
    "bootstrap": "^4.6.0",
    "react": "^17.0.2",
    "react-dom": "^17.0.2",
    "react-scripts": "4.0.3",
  },
[...]
The proxy will help in tunneling API requests to http://localhost:5000 where the backend application will handle them. Without this proxy, you would need to specify full paths:
axios.get("http://localhost:5000/api/v1/todos/");
With proxy, you can provide relative paths:
axios.get("/api/v1/todos/");
Revisit the src/App.js file and open it. In this step, we will remove the hardcoded todoItems and use data from requests to the backend server.
Open the App.js file and replace it with this final version:
// src/App.js
import React, { Component } from "react";
import TodoInput from "./components/TodoInput";
import TodoList from "./components/TodoList";
import axios from "axios";

export default class App extends Component {
  state = {
    todoList: [],
    activeItem: {
      title: "",
      completed: false,
    },
    editItem: false,
  };

  componentDidMount() {
    this.refreshList();
  }

  refreshList = () => {
    axios
      .get("api/v1/tasks")
      .then((res) => this.setState({ todoList: res.data.tasks }))
      .catch((err) => console.log(err));
  };

  handleChange = (e) => {
    let { name, value } = e.target;

    if (e.target.type === "checkbox") {
      value = e.target.checked;
    }

    const activeItem = { ...this.state.activeItem, [name]: value };

    this.setState({ activeItem });
  };

  handleSubmit = (item) => {
    this.setState({
      editItem: false,
    });
    // alert("Save :: " + JSON.stringify(item));
    if (item._id) {
      axios
        .patch(`/api/v1/tasks/${item._id}/`, item)
        .then((res) => this.refreshList());
      return;
    }
    axios.post("/api/v1/tasks/", item).then((res) => this.refreshList());
  };

  handleEdit = (item) => {
    this.setState({ activeItem: item, editItem: true });
    // alert("Edit :: " + JSON.stringify(item));
  };

  handleDelete = (item) => {
    // alert("Delete :: " + JSON.stringify(item));
    axios
      .delete(`/api/v1/tasks/${item._id}/`)
      .then((res) => this.refreshList());
  };

  render() {
    return (
      <div className="container">
        <h1 className="text-uppercase text-center my-2">Todo App</h1>
        <div className="row">
          <div className="col-8 col-md-6 mx-auto">
            <TodoInput
              activeItem={this.state.activeItem}
              editItem={this.state.editItem}
              handleChange={this.handleChange}
              handleSubmit={this.handleSubmit}
            />
            <TodoList
              items={this.state.todoList}
              handleEdit={this.handleEdit}
              handleDelete={this.handleDelete}
            />
          </div>
        </div>
      </div>
    );
  }
}
The refreshList() function is reusable that is called each time an API request is completed. It updates the Todo list to display the most recent list of added items.
The handleSubmit() function takes care of both the create and update operations.
Now when we visit http://localhost:3000, app will allow us to READ, CREATE, UPDATE, and DELETE tasks.
Conclusion
That’s all! I have covered the CRUD functionality of the app, which is allowing user to CREATE, READ, UPDATE, and DELETE tasks.
If you got lost anywhere along the way, check the repos react-todo-app to view the full source code of the project.
Happy Coding!
Releted Posts
Improving Business Processes using Machine Learning
Imagine your business has a contact form on its website. Every day you get many messages from the form, many of which are actionable, but it’s easy to fall behind on dealing with them since different employees handle different queries.
Read moreSentiment Analysis on Earnings Call Transcript
Earning call is a conference call between executives and major investors where they discuss their quarterly financial performance and future outlook.
Read moreTime Series Forecasting using Facebook Prophet
Forecasting with time series models can be used by businesses for many purposes, for example, to optimise sales, improve supply chain planning and many other.
Read more

